Friday, December 17, 2010

HOWTO: use the kinect as a mouse in linux


In an earlier post I explained how to get PrimeSense's NITE up and running and how to use the samples they provided. Now some people might be thinking "cool, but how can I use this?" I thought using NITE hand tracking to control the cursor would be a good and simple demonstration.

The linux kernel provides a means to create userspace input drivers using a feature called uinput. If you compile your kernel with uinput enabled as a module you can then simply:
modprobe uinput
to load the uinput module. Once the module is loaded you can use the piece of code I've embedded below to convert the coordinates output by the NITE code into actual mouse/cursor movement. In short:

(1) download the code below
(2) save it as ~/kinect/NITE/Nite-1.3.0.17/Samples/SingleControl/main.cpp (you might want to back up the original)
(3)cd ~/kinect/NITE/Nite-1.3.0.17 && make
(4)Note: do the following as root or using sudo

~/kinect/NITE/Nite-1.3.0.17/Samples/Bin/Sample-SingleControl

(5)Perform a focus gesture to start the hand tracking (check out my video above to see how to do that)

At this point you should be able to do what I do in the video above. You can also extend the code to generate mouse clicks, keystrokes, etc. Have fun.
At some point dropbox ate the public link for the source code I was using before and in the process of restoring from an old backup the formatting of the code below got a bit mangled... in any case here's a gist of what I salvaged:

Friday, December 10, 2010

HOWTO: Kinect + OpenNI/NITE skeleton tracking and gesture recognition in gentoo

Thanks to the folks at PrimeSense libraries are now available for skeleton tracking and gesture recognition.
UPDATE: Check here if you've gotten NITE working and want to try using the kinect as a Minority Report style mouse.
UPDATE:I've added a description of how to track multiple hands under the Sample-PointViewer description.

Here's how I got things working in gentoo:


(1) mkdir ~/kinect && cd ~/kinect
(2) git clone https://github.com/OpenNI/OpenNI.git
(3) cd OpenNI/Platform/Linux-x86/Build
(4) make && sudo make install
(5) cd ~/kinect/
(6) git clone https://github.com/boilerbots/Sensor.git
(7) cd Sensor
(8) git checkout kinect
(9) cd Platform/Linux-x86/Build
(10) make && sudo make install
(11) go to this page at openNI to download the latest NITE release for your platform: NITE download page or for the impatient:
32-bit
64-bit
UPDATE: download links now point to openNI and should work again
(12)Save the NITE tarball to ~/kinect and untar it
(13) cd ~/kinect/NITE/Nite-1.3.0.17/Data
(14)Open Sample-User.xml and replace the existing License line with the line below:
NOTE: this is case sensitive!

< License vendor="PrimeSense" key="0KOIk2JeIBYClPWVnMoRKn5cdY4="/>

(15)Repeat step 14 for Sample-Scene.xml and Sample-Tracking.xml
(16)Open Sample-User.xml and replace the existing MapOutputMode line with the line below.
NOTE: this is case sensitive!

< MapOutputMode xRes="640" yRes="480" FPS="30"/>

(17)Repeat step 16 for Sample-Scene.xml and Sample-Tracking.xml
(18)niLicense PrimeSense 0KOIk2JeIBYClPWVnMoRKn5cdY4=
(19)cd ~/kinect/NITE/Nite-1.3.0.17/
(20)sudo ./install.bash
(21)make && sudo make install
(22)cd ~/kinect/NITE/Nite-1.3.0.17/Samples/Bin

Now finally you should be sitting in a directory with all the sample binaries that you can play with. Here's what they should look like:
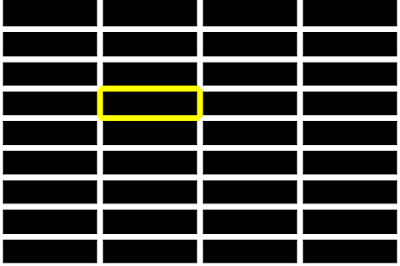
Sample-TrackPad:
This app will track your hand and show it's relative position on a grid. Run it and wave your hand,one of the squares on the grid should turn yellow to indicate your hand's location as seen below:


you should also get some debug output in your console:


Sample-Players
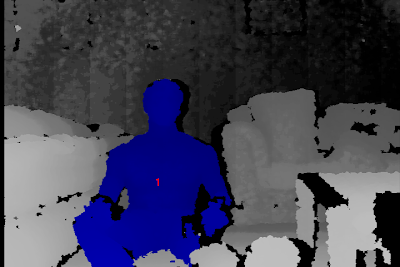
This app demonstrates the skeletal tracking. After starting it up, move around or wave until your body changes to blue (subsequent players will be other colors, e.g. player 2 is green, 3 yellow,etc.). At this point your viewer window should look vaguely like this:


and you should see something like this in your console:
Look for pose
Found pose "Psi" for user 1


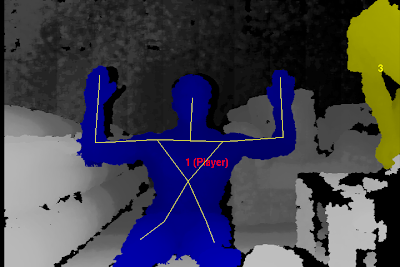
Now, hold your arms out to your sides bent 90 degrees at the elbows as shown below until a skeleton is overlayed on the image of your body:


At this point something like this should have appeared in your console:


Calibration started
Calibration done [1] successfully
Writing 217.596 50 50 78.4388 64.6762
Matching for existing calibration
Read 217.596 50 50 78.4388 64.6762

Sample-SingleControl
This seems to do some sort of gesture recognition and dynamically adjusts the camera resolution, so it's probably zooming in on an area of interest. When it starts out it asks you to perform a focus gesture. The NITE documentation doesn't seem to define what this would be but simply sticking one hand out in front of you seems to make it happy and you'll see the following output:


SamplePointViewer
This app does handtracking. UPDATE: to allow multiple hands to be tracked you will need to edit /usr/etc/primesense/XnVHandGenerator/Nite.ini by uncommenting the two config parameters it contains. Basically remove the semicolons at the start of each line so that Nite.ini looks like this:

[HandTrackerManager]
AllowMultipleHands=1
TrackAdditionalHands=1


To persistently track different hands in your code you can make use of the XnVHandPointContext.nID in your OnPointUpdate callback.


Sample-Boxes
This example allows you to click one of three boxes, your hand motion is tracked by a slider and depending on the context, up, left, right gestures will be recognized.


Sample-CircleControl
Wave to make the border of the window turn green. Then I think you need to send a focus gesture and then if you trace out a circle in the air with your hand the onscreen circle will follow your hand as seen below. In other words if you draw a clockwise circle in the air, the clock hand will also spin clockwise and vice versa. For some reason, this appears to be annoyingly inconsistent.


Sample-SceneAnalysis
This seems to just do player detection without skeleton tracking:

Monday, October 18, 2010

The magic keyboard


As I hinted at in an earlier post, the magic trackpad hardware is very well designed and bears a strong resemblance to the Fingerworks series of input devices. Now, I've decided to extend the functionality of this device by building a wireless multitouch keyboard using two magic trackpads. Currently, this keyboard will only work in linux since it relies on my extensive modifications to the linux kernel driver for the magic trackpad.

The first image above shows my two magic trackpads with plastic overlays to indicate key placement. It turns out the magic trackpad will still detect contact through a thin insulator placed on top of its surface. The overlays are simply standard laser-printable overhead projector transparencies. I originally considered laser etching the surface of the trackpads at TechShop, but I think I will hold off until I've settled on a key arrangement that I like. Here's a picture showing how I originally planned to lay out the keys relative to my hand.


For now, I opted against the layout above in order to simplify the code that converts coordinates to keycodes. The layout I'm currently using consists simply of three concentric circles, so the code simply checks which circles contain the current touch to determine the corresponding "row" and then compares the X coordinate to a table of thresholds to determine the "column". I created the layout seen in the other pictures using Illustrator. I'll post links to PDFs for the left and right halves in case anyone feels like trying this out.

The keyboard was intended to be placed on the lap to minimize elbow flexion. To hold the halves together I used two strips of rubberized truck tarp (very strong stuff used for a windsurfing roof rack). I'm still working out how to make this attachment adjustable without being bulky.


The transparent blobs seen on the home row of the keyboard in the previous images is clear nail polish. A few coats of this allowed creating a raised ridge to facilitate finding the home row while touch typing. This is actually the principal drawback of a multitouch keyboard- the inherent lack of tactile feedback. The nail polish helps somewhat, but I'm still thinking of other ways to mitigate this issue. The image below shows the nail polish blobs close up.


I currently have preliminary mixed typing/mousing support and a few simple gestures. I also implemented certain behaviors which I think make the use of a touchpad far more ergonomic:
(1)Moving the cursor and single clicking is done with two fingers rather than one.
This helps eliminate the annoyance of inadvertent cursor movement or clicks when a single finger alights on the trackpad. I also think it's more ergonomic, since for me using a single finger requires more effort than using two.
(2)Double clicking is done with a three finger tap- this eliminates the hassle of properly timing a double click.
(3)Scrolling is done with four fingers instead of two. This allows just plopping your entire hand down on the trackpad to scroll rather than contorting it to extend only two fingers.

Todo list:

Software:
Add support for modifiers (i.e. shift,ctrl,alt,meta) using chords.

Write a GUI to rearrange key placement which generates suitable header files based on user's choices. Perhaps eventually come up with a means to allow reconfiguration on the fly.

Hardware:
Come up with better attachment and adjustment system for the straps which connect the two halves of the keyboard

To give some context for this project- here's some images of the devices the magic trackpad derives from - the iGesture and touchstream. You can see that the magic trackpad is significantly smaller than both the iGesture and touchstream which is why I think that modifiers will have to be handled only via chords (no room for separate keys). In the images below there's a weird blob on the USB cords of the iGesture and touchstream- those are my improvised hot-glue strain reliefs.


Monday, August 30, 2010

Magic Trackpad using ten fingers and with gentoo linux support


I picked up a magic trackpad this past friday and decided to see what it was capable of under linux. The video above shows that the magic trackpad hardware provides a great deal of information to the host operating system. As I'd hoped it seems to be nearly as capable as a fingerworks igesture or touchpad in some regards. In the video you can see that the trackpad is able to: detect 10 fingers, track finger contact elliptical size (i.e. along two axes) and orientation, do all the above smoothly at a high sample rate.

The video was created by streaming the debugfs file entry corresponding to the trackpad into a pygame application. The pygame code parses the apple protocol packets to determine ellipse sizes, positions and orientations and then blits them to the screen on transparent surfaces. This code is by no means pretty, in fact "quick hack" is probably a better description. Any suggestions, enhancements, criticisms,etc. are welcome.

If you want to try the code below yourself, you first need to make sure you have debugfs set up properly. Assuming you enabled debugfs when building your kernel, make sure debugfs is mounted and if it's not, mount it with something like:
mount -t debugfs none /sys/kernel/debug/
Now, if you look in /sys/kernel/debug/hid/ you should see a directory whose name corresponds to the address of your magic trackpad. If you switch into this directory you'll see an events file which you can then read with cat, tail, or the python script below. Note that support for the magic trackpad is still in a very preliminary stage, so getting things working is fairly involved. I'll describe how to play around with the hardware at a low level in the description below.

First, start with a kernel new enough to have magic-mouse support. In my case, I chose gentoo-2.6.35-r5. Now grab the multitouch branch of Chase Douglas's debian git repository. You'll need to copy or merge several files from Chase's kernel source to your own:
/drivers/hid/hid-magicmouse.c
/drivers/hid/hid-core.c
/drivers/hid/hid-ids.h
possibly a few others

If you feel like using the same kernel as Chase, just skip straight to compiling his source tree. Once the kernel is built and you've booted into it, it's time to play around with the trackpad.

Depending on the version of bluez you're using, the procedure for pairing to an HID device will vary. In bluez 3.32 you would first set the trackpad as a trusted device using DBUS, which you could either do programmatically or using a graphical tool like d-feet to call the method
/org/bluez/hci0/org.bluez.Adapter.SetTrusted("bluetooth address of your trackpad").

Once the device is set as trusted you would need to actually setup a pairing as root:
passkey-agent --default 0000
then use d-feet or DBUS CLI to call CreateDevice("BluetoothAddress"). At this point if you call ListDevices() you should a new device corresponding to the trackpad.
Once you've paired with the trackpad and loaded the hid-magicmouse kernel module you should see messages in the system log indicating that a new input device has been registered.

input: Apple Wireless Trackpad as /class/input/input6
magicmouse 0005:05AC:030E.0005: input,hidraw4: BLUETOOTH HID v1.60 Mouse [Apple Wireless Trackpad] on 00:27:48:09:63:60
input: Apple Wireless Trackpad as /class/input/input7


Note that you'll also want an up to date installation of evdev, otherwise you might get messages like this:

evdev.c(EVIOCGBIT): Suspicious buffer size 511, limiting output to 64 bytes. See http://userweb.kernel.org/~dtor/eviocgbit-bug.html


If you want to see the touch reports the trackpad produces you can use the evtest application. In gentoo this is provided by the joystick ebuild. Now if you do

]$ evtest /dev/input/event6
Input driver version is 1.0.0
Input device ID: bus 0x5 vendor 0x5ac product 0x30e version 0x160
Input device name: "Apple Wireless Trackpad"
Supported events:
Event type 0 (Sync)
Event type 1 (Key)
Event code 272 (LeftBtn)
Event code 325 (ToolFinger)
Event code 330 (Touch)
Event code 333 (Tool Doubletap)
Event code 334 (Tool Tripletap)
Event code 335 (?)
Event type 3 (Absolute)
Event code 0 (X)
Value 3097
Min -2909
Max 3167
Event code 1 (Y)
Value 2238
Min -2456
Max 2565
Event code 48 (?)
Value 0
Min 0
Max 255
Event code 49 (?)
Value 0
Min 0
Max 255
Event code 52 (?)
Value 0
Min -32
Max 31
Event code 53 (?)
Value 0
Min -2909
Max 3167
Event code 54 (?)
Value 0
Min -2456
Max 2565
Event code 57 (?)
Value 0
Min 0
Max 15
Event type 4 (Misc)
Event code 3 (RawData)
Testing ... (interrupt to exit)


Now if you touch with two fingers you'll see a slew of output which should include something like:

Event: time 1283194689.870573, -------------- Config Sync ------------
Event: time 1283194689.870586, type 1 (Key), code 330 (Touch), value 0
Event: time 1283194689.870587, type 1 (Key), code 333 (Tool Doubletap), value 0
Event: time 1283194689.870589, -------------- Report Sync ------------

Sunday, May 23, 2010

Mac Mighty Mouse trackball embedded interface hack


Inspired by input nirvana from geekhack I got a free mighty mouse from a generous donor and went about interfacing to it. There's plenty of teardowns already available on the net, so I'll skip opening the mouse and just show this picture with the pinout to the trackball. Note that it's even simpler than most typical trackballs in that it doesn't make use of quadrature encoding for the two axes. The trackball actually has four distinct pulsed outputs corresponding to the four little wheels surrounding the ball. When rolling in any of the four cardinal directions (left,right, up,down) only one of those little wheels is actually spinning. Decoding the output of the overall trackball simply requires detecting pulses on each of the four pins. If the state of any pin changes from what it was during the last polling interval then you've moved in that direction. Instead of polling you could also just set up four pin change interrupts.

To test things out I hooked up the trackball to one of the new SMT connector boards from Schmartboard (seen in the picture) and from there to an atmega32u4.

At the moment I haven't decided whether to make a small wireless mouse out of this or integrate it into my kinesis project. I'm leaning heavily towards the former, since the keyboard already has 4 pointing devices.

Total time taken from disassembly to working USB trackball mouse (including the time for this quick writeup): ~2hours 10 mins.

Sunday, May 2, 2010

forearm massager for climbers (and keyboard users)


OK. the link here to keyboards is probably even more tenuous than my bluetooth scale but whatever. In the quest to relieve perpetually tense forearms due to bouldering + heavy keyboard usage I came up with this massager using easily obtained components. The total parts list with estimated price: (all items except for skateboard wheels were obtained at Lowe's)


4 skateboard wheels with bearings: $10 at target, but you can easily wind up spending far more for fancier wheels like the 70mm kryptonics wheels in most of these pictures.

2 4" wood clamps: 2@ $4.99 ea. = $9.98
2 5/16" x 8" machine bolts: 2@ $1.15 = $2.30
3 11"x1/4" threaded rods: 3@ $0.97 = $2.91
8 plastic spacers: 4 x (2 @ $1.09)= $4.36
2 pieces of thicker(1.5"x1.5"x8") wood: ? this was just scrap wood I had lying around, not sure how much it would cost.
(optional) 1 piece thinner wood (0.75"x1.5"x8") also scrap wood and not really necessary, just added to allow clamping in one other place.

4 pieces of 1/4" thick ABS plastic: ? scrap plastic I had lying around, not sure how much it would cost but small sheets of lexan or acrylic at Lowe's are pretty cheap.


Assembly:

Putting things together is pretty easy: thread one wheel onto one of the 8" bolts, followed by 2 plastic spacers.


Next, add another wheel followed by two more spacers and a piece of ABS plastic.

bluetooth wireless bathroom scale with fatsecret integration


Not exactly a keyboard, but I'd argue that a datalogging scale is an imput device... In any case, this is a project I did a while ago (~2 years ago). Start with a cheap bathroom scale from ikea, then strip out all the hardware except for the load cells. Add in the following:

microcontroller (AT90USB162)
roving networks bluetooth serial module


24 bit ADC (AD7799)


4 AA batteries +linear regulator (don't want switching noise here)+ input ORing diodes to allow powering from batteries or USB without damaging either (handy during development)

After assembling the above hardware, the microcontroller code was fairly straightforward- when a user taps a corner of the scale I take repeated ADC readings until the "running STD" (STD of last N measurements) drops below a certain threshold. At this point the scale will have a stable zero point to normalize the subsequent weighing. When the user stands on the scale I do the same thing- take ADC readings till STD< threshold. I chose the threshold such that the delay before convergence was short, at the expense of some accuracy. Left to run long enough the scale was able to detect the difference between my bodyweight and my bodyweight plus one US quarter. With the current threshold the scale appears to be repeatably accurate to within 0.1 lbs which for my purposes is acceptable. I was actually pretty happy to get that level of performance considering I didn't lay out a board for the ADC and just used a schmartboard instead.

One other metric I was happy about is the battery life - approximately > 9 months when used once or twice a day. I coded things such that the microcontroller is in a deep sleep until the user touches a corner of the scale. I could have taken a hardware approach and actually disconnected the uC power with a transistor until the user touched the scale, thus arming a delay circuit, but the software approach yielded more than acceptable results. The uC current draw is in the microamp range when sleeping and I use transistors to disconnect power from the bluetooth module and ADC while sleeping so I probably shouldn't have been surprised.
I think for a future revision of this project I'll actually spin my own main board. This would allow for a much more compact footprint and allow me to power from a smaller 3.3V source instead of the stack of 4 AAs. This latter arrangement was needed to avoid extensive rework of the olimex board where certain bits of hardware expect 5V.

On the PC side of this project I'm using bluez rfcomm server to listen for inbound serial connections and then run some other code when a connection is established. That other code consists of python scripts that insert the current reading in a sqlite database (which is then visible from my ruby-on-rails site) and submits the reading to fatsecret via its API. This data submission is done using OAuth, so the whole process requires no human intervention and I avoid any ugly hacks involving plaintext saved passwords.

Fatsecret is great because:
(1) it has an API
(2) it has an android version
(3) it can scan barcodes to fetch associated calories and nutritional content
Here's a screenshot from my phone showing a graph of weight readings for the last few months.


One final aspect of the scale which I find interesting is the means by which the user interacts with it. I intentionally made it so that scale does not have an LCD to show the current weight reading. Day to day fluctuations are not reflective of what really matters- long term trends. Usage of the scale thus boils down to the following:
(1) User taps lower corner of scale to initiate auto-zero sequence
(2) The scale turns on its sole LED to indicate that the zero process is ongoing
(3) The scale switches its status LED from solid red to blinking to indicate the zero process is complete.
(4) User stands on scale until LED turns off, indicating the reading has stabilized.
(5) User reviews cumulative weighing data at some later time (either via phone, or at their PC)

For fun, I added an additional means of relaying data to the user- spoken weights. By feeding the stabilized weight reading to festival (text to speech engine), the scale can "announce" the most recent weighing.

Wednesday, April 21, 2010

wireless split kinesis contour


I finally have almost all the hard issues sorted out and I've assembled the left side of my heavily customized kinesis keyboard. Here's what's currently working:

Seamless wired to wireless operation:
Recharges when it's connected via USB, but can still be used while doing so. When disconnected, the wireless interface starts working immediately. When reconnected the wireless is disabled.

Support for 4 pointing devices:
The final keyboard will have 1 trackpoint + 1 touchpad per side. I've verified that I can support 3, and I'm 99% certain that 4 should work. I'm using synaptics touchpads and trackpoints directly connected to my microcontroller. This means I can implement distinct functionality for left and right sides- e.g. one side scrolls, the other side moves the cursor.

Runtime selectable keymaps:
I'm using a microcontroller with plenty of flash, so I have room to spare for extra keymaps (e.g. QWERTY,Dvorak,etc.). I've verified the ability to switch between them on the fly.

Remaining Tasks

At this point I need to:
solder the right half of the key matrix to the controller
build the plastic housings for each half
integrate touchpads and trackpoints into plastic housings
try to ruggedize everything as much as possible

The mechanical stuff has always proved to be the hardest for me. In the picture above the keyboard frame is still in one piece because I'm still measuring out how to integrate 2 touchpads and 2 trackpoints- there's barely enough room. A very similar issue is why I ended up postponing further work on the wireless alphagrip; it was just too hard to fit everything back inside. When I get back to working on the alphagrip, my plan is to make my own more compact keymatrix, perhaps consisting of individually soldered keyswitches to free up room vs. a full PCB.